Wednesday, May 27, 2009
Library: Bookcases
I'm taking a break from the dining room for a while and working on the library at Myrtlewood Manor. As you can see, I've built a wall of bookcases.
Click here to read the rest of this entry...
I didn't build these entirely from scratch; I started with some unfinished bookcases I purchased on sale for about $6.00 each.
I added baseboards, plinth blocks, fluted casing and crown molding on the top. Then, because they were only 7" tall and I wanted them to go all the way up to the ceiling, I built the extensions on the top. For the top, I tried to mimic the construction of the bottom bookcases; it's not exact, but pretty close. I cut the arches using my scroll saw, and it is evident to me that I need a LOT more practice with this tool. It took me several attempts to get those arches even.
I'm still trying to decide whether to add cabinet doors to the bottom two shelves of each bookcase. It would involve working with those fiddly little hinges again, but it might look really good. Let me know if you have any thoughts either way.
I plan to add a brass rail about 7" up and build a ladder that hooks over it and rolls along the length of the shelves. I'm still trying to figure out how to do that, but I have some ideas.
Wednesday, May 20, 2009
Thank You!
I just wanted to offer a belated thanks for a few awards I've received:
Thanks Marlene!
Thanks Sans and Ara!
I'm so honored ya'll think my blog is cool, because I think you both have two of the coolest blogs around!
I think I'm supposed to award this to other blogs, but I'm not sure how many (Sans did 10; Ara did 3), so I'm just going to try to pick blogs it doesn't appear to have been awarded to yet:
First, to Teresa at Inside the Mind of a MiniMadWoman. Teresa's relatively new to the blogging world, but I've been a fan of her work for some time now. Check out her adorable houses, including Pennethorne Manor (my favorite!).
Next, to De, at De-Lightful Minis. She sometimes does several posts a day. I have no idea how she manages to be so productive!
Then, to Marlene, over at Somerset House. She's working on an 1820's townhouse, among other projects, and I just love her attention to detail!
Finally, to my sister, Amanda, at Amanda's Adventures in Sewing. Her blog's not about miniatures, but you should definitely check it out if you're at all interested in tailoring, fashion, shoes, witty writing or looking at pictures of cute girls modeling beautifully tailored clothing.
Saturday, May 16, 2009
Dining Room Wall 2
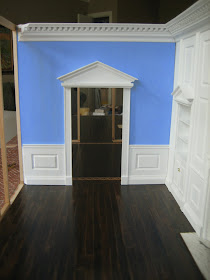
Here's the second wall I've finished for the dining room. This one took less time and went much more smoothly than the first wall, both because it's simpler in design(the only panelling occurs in the wainscotting) and because I think I'm starting to get the hang of building these.
Click here to read the rest of this entry...
I purchased the baseboards, chair rail molding and assorted parts for the crown molding, but I built the panelling myself out of 1/16-inch basswood. I also built the pediment over the door. Note how it matches the pediments over the china cabinet and the door to the butler's pantry. I purchased those pediments ready-made, but then couldn't find a similar one in the larger size I need for this door, so I ended up having to build my own. I'm pretty proud of it, actually.
The door leads out to the entrance hall. I was originally going to put double doors here, but I couldn't figure out which way they should swing; there just isn't a lot of clearance for swinging double doors on either side of the wall. Sometimes when I can't figure out how I'm going to do something, I try to forget about it and work on other things for a while, and then the answer just comes to me: pocket doors! They were quite common in Victorian architecture, and while Myrtlewood was originally built in the early 1800s, there's no reason her owners couldn't have installed pocket doors when renovating in the 1870s-80s.
Of course, now I have to tear out some of the framing and figure out how to build and install the doors so they slide in and out properly. Details!
Sunday, May 10, 2009
Cellarette Redux
Some months ago, I built a little cellarette from a kit. As I mentioned in my previous post, I wasn't altogether happy with the way it turned out. I spent a little time recently reworking the piece and like it a lot more now.
Click here to read the rest of this entry...
First, I added some higher-quality hinges to the lid so it would open and close without binding. Then I added a lock to the front and built and installed a divider in the main compartment, similar to those I've seen in pictures of real-life cellarettes.
I beveled the top ege of the lid for an overall less boxy appearance. This little detail isn't very noticeable from a distance, but I think it makes a big overall impact nonetheless.
I found these adorable little casters (the wheels really turn!) and added them to each leg.
Finally, I lined the drawer with green "leather" (actually, just some scrapbook paper I have in my stash).
I think it looks a lot more realistic now, and that's one of my main goals in my miniature endeavors. What do you think?
Friday, May 8, 2009
Dining Room: Built-in Cabinet
As you can see, I've finally finished the built-in china cabinet in the dining room.
Click here to read the rest of this entry...
I completed the shelves and cabinet doors weeks ago, and thought I was nearly finished with it. When I tried to affix the hinges, however, I ran into one issue after another. They really are fiddly little things; here's a picture of one of them photographed with my thumbnail:
I promise you, I do not just have huge thumbs! They really are that tiny. The worst part, though, was getting them to stick to the cabinet walls; I've now learned that even superglue doesn't always like to stick to paint. From now on, I will be affixing hinges first, and painting later.
Anyway, when something is really frustrating me, I've found it helps to take a break from it for a little while, so I spent the last few weeks working on a few other projects, which I'll post soon. Sure enough, when I finally got back to the cabinet doors, they didn't seem so bad after all and I finished in a jiffy.
Oh dear. It looks like Mary has started putting some of the family's tableware away in the cabinet. Don't you think someone should tell her it's likely to get quite dusty from all the construction to come?
Saturday, May 2, 2009
Mary Moves In
Meet Mary, the maid at Myrtlewood Manor (I seriously didn't name her for the alliterative effect, but it's kind of cool - perhaps I'll give all of Myrtlewood's inhabitants "M" names).
Click here to read the rest of this entry...
My husband is rolling his eyes right now, because I swore up and down (rather vehemently, I admit) when I was planning Myrtlewood that I'd never have dolls. I still mostly feel that way - unless they're very well done (read, super expensive), dolls tend to ruin the realism of a miniature scene, to me at least. Strangely, I don't feel that way about miniature animals, just people.
Anyway, despite my aversion to placing dolls in my miniature scenes, I was having a bit of difficulty visualizing Myrtlewood's scale: Is the dining room actually large enough to seat 10 people and have others moving around to serve them? Are these doorways tall or wide enough? How high up should I afix the candle sconces?
To aid in such visualization, I purchased a very cheap 1:12 scale doll off eBay. She was advertised at 5 1/2 inches, but when you add her heels and rather ridiculous hairdo, is almost 6 inches. That equals 6 feet in 1:12 scale, which is taller than most men of that time period! So Mary's a little taller than I bargained for, but that's okay - I didn't pay very much for her, and I figure if she fits well into a scene, it's probably close enough in scale.
Thus, Mary will be residing at Myrtlewood for now, cleaning up construction dust, and appearing in photographs now and then. Poor dear, I fear it may be several years before she actually gets a roof over her head, though.