I've spent the last few days baking. No, not Christmas cookies, although I'm wishing I had a few right about now. Rather, I've been mixing, shaping and baking polymer clay into marble mantles, hearths and fireplace surrounds.
This set is for the dining room; I made a nearly identical set for the parlor.
Click here to read the rest of this entry...
It's a bit hard to tell from the photo, but this set is pink marble (for the conservatory/music room).
I also made a set of black with veins of gold for the library.
I still need to add a coat of clear lacquer; I photographed them before the lacquer to keep the flash from bouncing off them.
I'm really pleased with how these turned out. One of the things I really love about miniatures as a hobby is that it encourages creative problem solving. I spent a lot of time trying to figure out how to make marble in miniature. I read about some faux painting techniques, but I've never been very good with paint. Also, the results don't seem to have much depth. You can buy marble tiles from miniature shops, but they're expensive and only come in certain dimensions. But with polymer clay, I can create any dimension I want and achieve, through the incorporation of translucent clay, some of the depth that is so characteristic of marble. I also plan to use this technique to create marble decorations, vases, statuettes and furniture tops.
Sunday, December 21, 2008
Thursday, December 18, 2008
Christmas Present
Okay, so I guess you know you've really gone off the miniatures deep end when you start asking for power tools for Christmas! Check out what my dear husband gave me for Christmas:
Click here to read the rest of this entry...
I got it early because he was so excited when he bought it that he couldn't wait until Christmas to give it to me. He does that sometimes. Also, he might have had a hard time hiding it until then; it's not small.
I bought blades for it and have used it a few times to make some uncomplicated cuts. I think I'm going to need a lot of practice with it before I'll be able to make anything intricate.
Sunday, December 7, 2008
Kitchen Beginnings
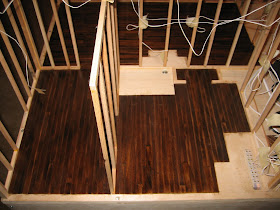
There's not a whole lot to see here right now, but I wanted to assure you that construction on Myrtlewood is still underway! Here you can see the floors I've finished for the kitchen (right) and butler's pantry (left).
Click here to read the rest of this entry...
Note the spaces in the kitchen for the stove (left back), what will be a small pantry (right back) and a servant's staircase (right front). Part of the servant's staircase will pull out to give access to the wiring. Maybe. Now that I've already wired that part, I'm thinking about switching up where I put the circuit board. If I change that, I'll have to rerun all the wiring. Sigh.
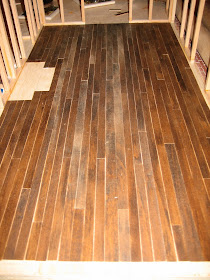
I've also finished the floor for the dining room.
I'm about 2/3 finished with the floors for the first floor now. I really need to finish them before I start on the walls, but creating them is so tedious, I keep getting distracted by other things! I really will finish them one of these days!
Next time: pictures of my early (miniature building-related) Christmas present from my dear husband. I've been a very good girl this year!
Sunday, November 30, 2008
Goodies
Just wanted to show you all of the fun stuff I recently purchased online. It's molding and clapboard, mostly. Don't you just love all the detail in the specialized moldings?
Click here to read the rest of this entry...
Here's a stove I recently received in the mail.
As you can see, all the little doors and drawers open.
I'm so excited about this purchase! It's made by Bodo Hennig, a well-known brand high on quality and detail, and usually runs about $80.00. I won it in an eBay auction for about $13.00 plus shipping (the unfortunate seller did not use the correct brand name in the listing title and it was thus missed by all the people who normally search for "Bodo Hennig" auctions). I just love a bargain!
Tuesday, November 18, 2008
Framing
I mentioned in an earlier post that I would discuss Myrtlewood's framing at some point. When I first designed Myrtlewood and started researching how to build it, I learned that almost all dollhouses seem to be built of plywood. That generally works well because it's sturdy and relatively easy to measure and put together. It's also really heavy. My plans for Myrtlewood include a rather large footprint (60" by 31") and a fair number of interior walls. Using plywood for all of that would result in a house weighing hundreds of pounds. Fortunately, rather early on in the design process, I ran across an online article on scale carpentry, including scale framing of miniature houses. The article provided few details, however. I searched and searched for more information on this building method and have since found one book and a few additional online pictures of framed projects. There just is not that much information out there on how to do this. That's one of the major reasons my husband encouraged me to start this blog - to create at least one more site with some information on how to build scale miniatures using a framing method.
Click here to read the rest of this entry...
Originally, I intended to use store-bought doors and windows (more about why I eventually chose not to and how I plan to make my own in a later post), so I wanted Myrtlewood's walls to be of a standard thickness, which for dollhouses is 3/8". I thus used 1/4" basswood strips for the lumber and will use 1/16" posterboard for the "drywall." I did not use nails; I was concerned that they would only split the wood, and wood glue works very well and is just as strong. Below you can see how I framed the first floor.
First, I drew out the placement of all the walls on the plywood base. I used pencil because I tend to make a lot of mistakes!
Then, I glued down the baseplates. If you have ever seen a real-life house in the process of being built, you will perhaps recall that this is the way real-life houses are framed. Incidentally, I have found real-life construction techniques very helpful in determining how to build Myrtlewood. I read a few online articles on the subject and also looked back through the many, many photos we took while we were having our real-life house built (my husband told me those would come in handy some day!).
One the base plates were properly situated, I framed up the rest of the house. I have seen photos of people who have done this beautifully, with all of the studs spaced exactly 2" apart. I didn't do this because (a) I didn't want to (although I am a perfectionist, I can also be impatient at times, and this was one of those times), (b) those basswood strips are a bit pricey, so I wanted to use as few as possible, (c) actually very few studs are needed to bear the relatively light weight of the floors above, and (d) all the framing will eventually be covered by "drywall" and trim anyway.
I haven't installed the window and door headers yet, because I still haven't figured out how high the windows and doors will be.
That's it! I'll show you how I plan to install the "drywall" once I actually get to that point. Ditto on the ceiling and second floor.
Wednesday, November 12, 2008
Cellarette
I decided to take a break from my endless floor construction and build one of the furniture kits I've been stockpiling. In the 70s and early 80s, when miniatures enjoyed substantially more popularity than they do today, X-acto made these great little furniture kits, miniature replicas of real-life American antique furniture, mostly in the Chippendale, Queen Anne and Hepplewhite styles. Each piece is precision-milled with lots of detail, and they go together pretty easily. Sadly, these are not made anymore; I've been buying most of mine on Ebay and have built up a pretty sizable collection.
Click here to read the rest of this entry...
This kit was for a cellarette, a small cabinet used to hold wine or other spirits. I searched online and found a few real-life examples of antique cellarettes:
The kit was pretty easy to make. After reading the instructions, I sanded, pre-conditioned and stained each piece.
I chose to stain each piece first, rather than staining after I had the entire cellarette assembled, because I used regular wood glue to put it together. Any place on the wood you get the glue will no longer take a stain. Some people are just very careful with their gluing. I am also very careful with my gluing, but for some reason always use just a little too much or too little, and don't want to take the chance. So I always stain first.
Here's the final product, finished with a few coats of polyurethane:
I'm not completely satisfied with how this turned out. The hinges that came with the kit are a little flimsy and don't want to close all the way, so I'll probably replace them with some of higher quality. I'm thinking about putting a small lock on the front of the box, like you can see in the pictures of the real-life cellarettes above, and I may add some casters to the legs, too, if I can find some small enough.
Sunday, November 2, 2008
More Floors
I absolutely adore libraries. I think you can get to know so much about a person just by looking at the types of books with which he has chosen to surround himself. I especially loved the libraries in the movies My Fair Lady, Disney's Beauty and the Beast and The League of Extraordinary Gentlemen. I'm also really inspired by several real-life libraries:
Click here to read the rest of this entry...
Melk Abbey in Austria:
Biltmore Estate in Asheville, NC:
I therefore knew Myrtlewood would have a library before I'd even given a thought to any of the other rooms. I had to balance my desire to build a huge library, though, with my lack of desire to make thousands of tiny books (seriously, they are a pain to make). So Myrtlewood's library wil be small and cozy, but I will find a way to work some luxury in.
Which leads me to the floor. Yes, I'm still working on floors; I fear I may be working on them for a year or more, at the rate I'm going. Anyway, I'd been inspired by a parquet floor in a window pane design I'd seen somewhere and thought it would add some interest to my little library. Here's how I created it.
First I figured out the dimensions I wanted for each piece (3/8" wide for each walnut plank and 6/8" square for each cherry piece), then measured out the design, centered it in the room and drew the entire design in pencil on the plywood floor.
Then I cut and glued down the vertical walnut planks.
I cut and sanded each horizontal strip so that it fit perfectly.
Even though I'd measured the walnut planks very carfully, there were still variations in the sizes of the open spaces. So I cut and sanded each cherry square to an exact fit. I do not have pictures of me doing this; I'm still trying to block the entire painful process from my memory. Here's what it looked like when I'd finished.
I finished it as I usually do: by sanding, restaining and giving the entire thing a few coats of polyurethane.
Not bad. I think I'll keep it.
Friday, October 24, 2008
Wood Floors
The time period I picked for Myrtlewood is the mid-1880s. For that reason, and also because I don't really care for the look of dollhouse carpeting, Myrtlewood will have wood flooring throughout. This is a big project, as I am cutting and placing each plank individually. Here you can see how I made the parlor floor.
Click here to read the rest of this entry...
First, I pre-conditioned and stained several pieces of 1/32" basswood a deep walnut color. I chose to stain the wood first, rather than laying it all and then staining it, because I like to take the wood grain into account when placing each plank, and I can see the grain much more clearly when it's been stained.
I cut planks 3/8 inches wide by 12 inches long and began laying them onto the plywood base, staggering the end joints, as you can see below.
As I glued them down to the floor, I weighted them down for a few minutes to keep the planks from curling up on the ends. Some people use contact cement instead of glue to keep the thin wood from curling, but you can't really move the pieces once they've contacted the base, and I'm just not skilled enough to lay everything perfect the first time! I need to be able to adjust each plank slightly after I've laid it down on the base. So I just use regular wood glue and a very sophisticated weighting system:
Here's what the floor looked like once I'd laid all the planks:
After I was sure that all the glue had dried, I sanded the entire floor to smooth it out, wiped up all the sawdust with a damp cloth and then restained the entire floor. Once the stain dried, I gave the floor two coats of a polyurethane sealer, sanding lightly in between coats. Here is the finished floor:
One floor down, only eighteen more to go!
Friday, October 17, 2008
Inspiration: The Thorne Rooms
I am a perfectionist by nature, so of course as soon as I decide to do something, I have to do it as perfectly as possible! I hadn't been researching miniatures too long before I stumbled onto the Thorne Rooms, incredibly detailed 1/12 scale miniature rooms designed by Mrs. James Ward Thorne and built by master craftsmen in the 1930s. Many of them are on display at the Art Institute of Chicago. They are absolutely breathtaking.
Of course, once I'd seen them, I knew I had to try to achieve their level of perfection. I never will, of course; I don't have Mrs. Thorne's resources and will be doing almost all the work myself, rather than hiring master craftsmen. But this is the level of realism I'm striving for when building each room of my house. The challenge lies in seeing how close I can get to perfection!
Sunday, October 12, 2008
Laying Brick
I wanted the long front porch of Myrtlewood to be made of brick. But the individual bricks sold at dollhouse supply stores are expensive and too thick for my purposes, and the bricks that come in sheets just don't look realistic to me. I've seem some fantastic results from people who sculpt bricks out of clay, but I haven't worked with clay much (yet!) and needed something more foolproof. The most realistic results I've seen have resulted from a technique using cardboard egg cartons (yes, you read that right!). I found a great tutorial online and was eager to get started.
So I started cutting up the egg cartons I had stashed just for this purpose. I cut, and I cut and I cut some more. Then I rested my hands for a few days and then I cut some more! I cut out each "brick" by hand, and even snipped off each corner of each brick for a more realistic look.
When I had a fair number prepared, I started gluing them, one by one, directly onto the plywood base. As the porch runs the entire 60-inch length of the house, I had a lot of brick to lay!
Don't worry; it's going to look really good once I finish!
After I had glued down all the bricks, I sponge painted them, first using a burnt sienna base and then layering several other colors over the top until I achieved a more realistic brick color. Then I sprayed the whole thing with a matte sealer. Once that was dry, I spread grout with my fingers over the brick, pushing the grout down into the crevices between the bricks and wiping off the excess with a damp sponge. Here's how it looked once I finished:
Bricking the front porch took me two entire weekends to complete, so I don't think I'll be bricking any other large areas of the house (although I do intend to use this same technique to brick the insides of all of the fireplaces). It was totally worth it for the porch, though. I think it turned out great and am so pleased with how realistic it looks!
Monday, September 1, 2008
Foundation
I spent nearly a year designing Myrtlewood and researching how to build it. Early on, I knew it would be large (60" long by 31" deep) and would need a very sturdy base. I built the base out of 3/4" birch plywood. This was much more expensive than regular plywood, but it provides a very nice surface on which to work and it's very strong so I don't worry about it bowing in the center from the weight of the house. I worked out the dimensions of each piece of the base before going to my local Lowes to buy the plywood. They cut it there for me (for free!) to my exact specifications. Here you can see how I assembled it.
It's a very simple design: just a 60" x 31" rectangle with 3" wide strips attached perpendicularly on all four sides. I glued and clamped the pieces together and then, after everything had dried, added about 20 screws total. This baby is secure!
As I was working on the base, I spent a lot of time looking for a table on which to set it. I hunted through stores, assorted catalogues and online, but just couldn't find one that fit my specifications. Finally, I had an epiphany. Why not make the base of the house itself into a table? I found a great company online that makes table legs and ordered an adjustable pair. These are absolutely perfect! They adjust up and down 24" to 36", so I can set them high to work on the ground floor and lower when I want to work on the upper floors. And if I ever need to lower the house all the way to the floor, the legs fold up and can be completely contained within the base. I just love its versatility!
Here's a picture of the entire table; you can see I've already started the framing - more about that later!
Thursday, August 28, 2008
Beginnings
When I was little, I used to accompany my mother on her frequent trips to our local hobby/craft store. While she shopped, I would invariably find myself in the miniatures aisle, staring longingly up at the dollhouses on display, imagining how I would decorate each one with miniature furniture and accessories.
One year for Christmas, there it was - a dollhouse under our tree. Imagine my disappointment when I found it was addressed to my younger sister! To be fair to my parents, I was 13 by that time, and I think they thought me too old for dolls. What they didn't realize was that it was the miniature aspect of the dollhouse, rather than its potential to house dolls, that fascinated me so.
Flash forward a few decades: I was in a hobby/craft store, happened by the dollhouse display and felt a tinge of regret about the dollhouse that I never had. Then it occurred to me that there's absolutely no reason I can't have one now!
After searching all over for one, I just couldn't find exactly what I wanted. So I decided to build one! Undaunted by the fact that I have absolutely no building experience, I spent a year researching and designing my house, which I have decided to call Myrtlewood Manor. This blog will chronicle my building efforts, both successes and failures (although I'm obviously hoping there will be more of the former than the latter). I hope you enjoy it.